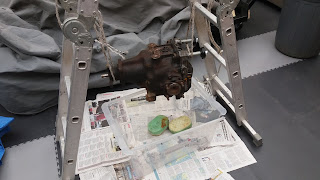
Heavy bugger this.
First it needs to be cleaned. I strung it up between a pair of step ladders. Put a bin underneath and scrubbed with Gunk and hot soapy water until at least most of the oily grime was removed.
Of course, I had gunge and smelly Gunk everywhere, water all over the floor.
There has to be more to life than this. Called the whole thing to a halt and went off to the Ripley Classic Car show.
Where I happened to meet Peter who runs a metal cleaning business just up the road called Bare Metal
Or he did. Peter is from Down Under and was once ensconced in North Yorkshire. He has now moved back to Oz so we need to find someone else who provides a similar service. Anyway, after discussing how rubbish all the metal cleaning products on the market are I resolved to throw all my dirty corroded bits in the back of the car and deposit them on his door step.
A few days later the Diff came back looking like this:
I swear, if I ever do this again, I will just dismantle the Jag donor parts, take them to Peter, or someone similar, collect a while later and all that is left is to get artistic with the paint brush. But not the ally parts. They look fine as they are and just need some corrosion inhibitor. And the stuff for that is ACF50. Google it.
Now, this will cost. But allowing for all I have spent on useless cleaners and degreasers, and the time and mess trying to clean the parts myself, it has to be worthwhile.
There is another added bonus which will thrill and delight but that will be in the text for the rear hub recon.
So, off with the rear cover and check the internals. I had a local garage look at the Diff, they said it seemed in good condition with no discernible play or roughness. I checked it had all its own teeth and last thing is to check the backlash.
The spec for backlash of the main gear wheel seems to be a closely guarded secret known only to a Jag Diff Reconditioning cult of worshippers. That or I'm crap at Goggle searching. Measured it anyway with a DTI gauge and got a reading of < 0.02mm in four different locations around the wheel. That is really small. What specs I could find for other Diffs mention 6-10 thou.
So, all done, clean the mating surface, a line or two of RTV instant gasket and the cover goes on with new spring washers.
I thought I would do something other than paint it black. Everything else is black. It's starting to sound like a Rolling Stones track. So I got me some POR 15 engine enamel in Cadillac Dark Blue.
I did paint the drive shaft hubs black though, and with the ally rear cover gleaming after a dousing of ACF50 it is looking smart enough to take on a date.
To make this a one man job, I made a little platform bolted to the hydraulic jack.
Naturally the thing doesn't fit the chassis. Close, but no cigar, until we modify things a bit.
First had to cut 3mm from the edge of the washer/spacers so the hole would line up on the diff casting. Then shave 3mm from the edges of the upper rear mounting plate on the chassis. I expect Jag used different diffs through the years. Apparently there is a Salisbury diff and a DANA diff, I guess the castings are slightly different. Finally the four holes in the front plate where the diff node goes in are only just wide enough for the mounting bolts. There is no play or tolerance at all, and of course only one hole aligned correctly to get the bolt started on the thread. The other three had to be drilled out an extra 2mm and then routed with a round file. In the end I could get all four bolts started with finger pressure.
Finally after a lot of jiggling I decided to get back to fitting the diff. And it is now in place.
Notice the input hub is off centre to the centre line of the chassis. So the prop shaft is not going to be a straight line. More transmission loss from the flywheel. Lucky we got lots of power to start with.
Cleaned copper grease from the threads, the nyloc nuts are not where you want grease.
Torque settings:
Four small nose bolts: 30lb/ft
Large upper front nuts: 55 lb/ft
Rear upper bolts: 45 lb/ft


No comments:
Post a Comment